Holiday Baking – Chanukah House

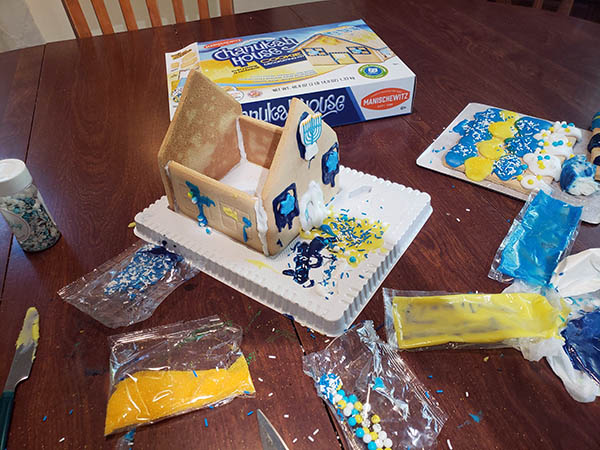
We love making holiday houses and this Chanukah House was no exception!

Made by Manischewitz, this product checks off all the holiday boxes: sweet treats, imagination, family fun, and meaningful giving.

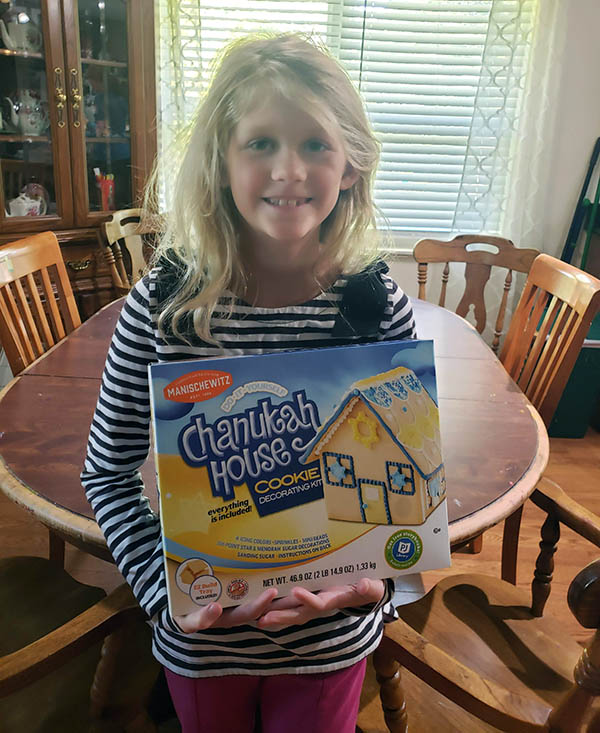
The do-it-yourself Chanukah House cookie decorating kit (MSRP $12.99 – 15.99; 2 lbs., 14.9 oz.) comes with everything children need – from cookies and icing to a sanding sugar and a candy menorah – to build their own edible holiday cottage.

Best of all, when you give this charming gift to a young one, you’re also giving the gift of books to kids the world over. Because, the kit is at the center of a special promotion by Manischewitz to drive consumer sales and raise awareness for PJ Library, an organization that sends more than 225,000 free Jewish children’s books every month to households in the U.S. and Canada.

I’m always excited about organizations that provide books for kids! Every Chanukah House box features a callout encouraging consumers to sign up for free storybooks of their own from PJ Library.

While the Chanukah House kit is designed for Jewish families, and we’re not Jewish, I love things that add to my children’s cultural experiences. This was a fun and educational discussion starter. While building (and eating) the house, we talked about the monorah and the blue and white colors of the house and how in Jewish culture they celebrate Chanukah around the same time that we celebrate Christmas – so the holidays always overlap their items in stores.

It was fascinating to see my kids think through how not everyone celebrates the winter holidays the same way, and I loved how excited they were to discover how Jewish families celebrate this time of year.

The Chanukah House cookie decorating kit will be available at Ralph’s, ShopRite, Stop & Shop, and Walmart, and on Amazon, among other outlets.

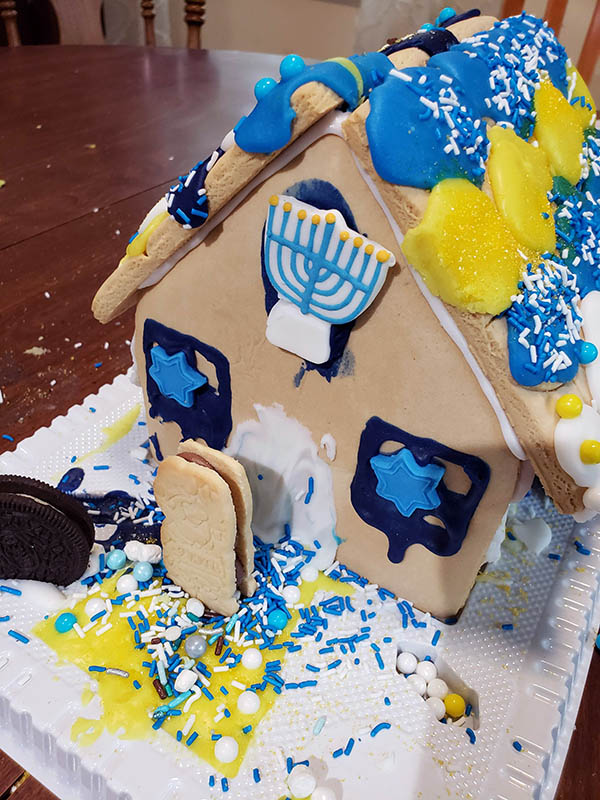
We had some elf cookies and the kids just had to have one of them visiting the Chanukah House. I love how they got into the spirit of celebrating another culture’s holiday!

About Manischewitz

The Manischewitz Company has been making traditional Jewish foods since Rabbi Dov Behr Manischewitz first opened a small matzo bakery in Cincinnati, OH in the late 1800s. For more than 130 years, the company’s goal has been to provide quality kosher products that bring families together and celebrate the traditions of Jewish heritage. Today, Manischewitz sells hundreds of delicious products to communities across the globe.

About PJ Library

Part of the Harold Grinspoon Foundation, PJ Library is a free program that sends families expertly curated, age-appropriate Jewish children’s books each month. At reading time, parents and kids can explore Jewish values and traditions together through engaging stories. The PJ Library experience changes at age 9 when kids can move up to PJ Our Way and choose their own middle grade book or graphic novel every month.  To learn more and to sign up to start receiving free monthly books, visit pjlibrary.org.

Many thanks to Manischewitz for sending over this amazing Chanukah House Kit for me (and the kids) to review!

Keep Kids Smart with ART

Starting this Friday, March 20, the Boca Raton Museum of Art is launching a new series of free Online Community Art Initiatives for all ages at this link. Featuring the new Keep Kids Smart with ART series to help parents and their children who are home from school.

The Museum has always provided the community the added benefit of an Art School campus with an innovative art faculty, since its very beginnings in 1950. These art educators are using their expertise to develop online resources using the power of art. Also for seniors who are keeping social distance and who might feel isolated.

This series will provide art-oriented ways for people to creatively utilize their new free-time at home. Online art lessons, tips for parents to use art-making and creativity with their kids at home, and activities for all ages.

The resources on this landing page will evolve as time passes, as the art teachers receive feedback and reactions from families about their needs. It will also branch out to the Museum’s social media channels for ongoing activities — #BocaMuseumatHome.

Mirror, Mirror; Mulatta Seeking Inner Negress II – Alison Saar

New Exhibit: The Ultimate Collection of “Selfies” by America’s Leading Artists: from 1901 through 2015.

The term self-conscious takes on a whole new meaning in today’s social media era.

At a time when millions of selfies are posted every day and identity is proving to be more fluid, this exhibition from the Smithsonian’s National Portrait Gallery shines a new light on self-portraiture and representation.

The show was created to commemorate the National Portrait Gallery’s 50th anniversary, celebrating the artists who make the NPG Collection so extraordinary.

Eye to I brings together the work of major artists of the 20th and 21st centuries, at the Boca Raton Museum of Art. The powerful works are from every decade, starting in 1901 and continuing through 2015.

The Museum is launching a new series of free Online Community Initiatives for all ages, including Keep Kids Smart with ART that will aim to help parents and their children who are home from school.

These free Online Community Initiatives will also reach out to seniors who are keeping social distance and who might feel isolated.

Starting on Friday, March 20 the Museum’s website will provide regularly updated links to new ongoing activities here, including live interactive streaming and tips for parents.

The Museum has always provided the community the added benefit of an Art School campus with an innovative art faculty, since its very beginnings in 1950. These art educators are using their expertise to develop online resources using the power of art.

Quote from the Museum Director:“Art, culture, and creativity have always made a difference in powerful ways, especially during challenging times,” said Irvin Lippman, the executive director of the Boca Raton Museum of Art. “While the Museum is temporarily closed, we will continue to give back to the community. Being inspired and creative have not been canceled. These artists in our new exhibition, “Eye to I: Self Portraits from the National Portrait Gallery,” made a lasting mirror effect of themselves, cutting across time and creating a very personal art that engages us – the viewer.” adds Lippman.

According to the National School Boards Association, kids who study art are four times more likely to be recognized for academic achievement.

Studies show that art helps kids earn higher report card grades because skills developed through art lead to better learning in other areas.

Tips for parents and students on using art in your home:

  • Provide a special “creative zone” at home.
  • Make sure that your “creative zone” is mess-friendly and able to stand up well to spills and art-related fun.
  • Focus on the fun process, not on the outcome.
  • Create a special area to showcase your child’s artwork.
  • Watch and encourage your children as they work on their art.
  • Ask them questions to engage them while they create.

Check out Boca Raton Museum of Art’s online art today!

Fall Favorites

I’m writing this post as one of a group of posts with other bloggers about some things/items we just love about Fall. After you read my post, check out their posts below and see what things other people like about fall as well!

There are things uniquely fall that I just love. The smell of apple cider, colorful leaves, and crisp mornings with a steaming cup of coffee, to name a few. While summer is my favorite season, I still enjoy fall, and all the different smells and sights that come with it.

I started working on this list and realized that my favorite things about fall seem to center around food. Caramel sauce, sweet potatoes, tea, etc. It’s just that time of year when I feel like baking and cooking. I included some food on my list but did my best to include some other things as well.

IMG_20171005_120039

1. Mickey Jack O Lantern – I purchased this years ago at a silent auction. The tag said it was Disney though. Every fall, we pull it out and my kids use it as their bathroom nightlight all October and November.

I hide it again when we return home after Thanksgiving, and we save it for next year. I think the kids love seeing the fun Mickey smile through the fall, plus it’s not terribly bright so it makes a perfect nightlight.

IMG_20171005_120028

2. Fall Candles – I just love candles, and fall has some really great scents. Pumpkin, leaves, cinnamon, apple, etc. All those wonderful, comfort scents that come with fall. Plus since it’s getting cooler out it’s nice to have a candle burning to give the feeling of warmth – since I don’t have a fireplace.

I love a fireplace, there just isn’t one in my house. So I make do with what I can. For me, that means lots of candles in the fall and winter months.

My favorite brand is Yankee Candle. They just always burn well and smell so great! This Autumn Wreath scent is one of my favorites, it’s fall, without being festive. Since I like to save the December holiday scents for December so I can enjoy fall for as long as possible.

The real trick with candles is keeping my kids from blowing them out before I’m ready. Since my kids just love blowing out candles.

IMG_0005

3. Russian Tea – My husband introduced me to this years ago. It’s a super simple “tea” to make, delicious, and so perfect for a crisp fall evening. Last week, I mixed up my first batch of Russian Tea for this fall. It’s something everyone in my family loves. And with the Tang, it even has some vitamin C.

I love to mix up a mason jar full and just keep it on my counter for whenever I want a cup.

20161116_102647

Russian Tea

1 cup Tang
1 cup instant tea (I prefer Lipton)
1/4 tsp ground cloves
1/4 tsp ground cinnamon

Pour all ingredients in a mason jar, close the lid, shake until well mixed.

To make tea, mix two heaping spoonfuls of mix with boiling water in a coffee cup.

IMG_20171010_112206

4. Salad Spinner – It’s that time of year when my CSA gives me lots of lettuce. Around here, we get lettuce in the spring and lettuce in the fall. My salad spinner is a lifesaver. I love salad, and fresh lettuce is delicious, but it’s a pain to dry.

This salad spinner works great, and is so easy to use that usually my kids spin my lettuce dry for me. I usually spin a whole head of lettuce, dry my spinner, then just cover it with a towel in the fridge and I have delicious, clean, lettuce in my fridge for days!

I bought my spinner a few years ago so it’s no longer available on Amazon, but I did find one that looks just like it.

IMG_20171010_112210

5. Leaves – And last but not least, I just love the leaves in the fall. I love the colors, the crunch, and just the fun of making a pile and then playing in it. I don’t do much jumping in leaves these days, but it sure is fun to watch the kids play in the leaves. The great part is the play, rake, play, and wear themselves out, then all come in and take baths. It makes for a very fun day for them with minimal effort from me.

IMG_20171013_173039

What’s one thing you love about fall? Check out these other awesome blogs for more fall inspiration!

Joanne from Seasonal Family Fun | Stephanie from Wife Mommy Me | Alicia from TaylorLife | Rachee from Say It Rachee | Jenny from Chocolate ‘N Children | Jennifer from Simply At Home Mom | Jenn from More Than A Mom Of Three | Laurie from Steals & Deals For Kids

* This post does contain affiliate links.


3Doodler Party and Review

This is a sponsored post. Thanks to Tryazon for this awesome party pack!

In our party pack we received:

I’d seen the 3Doodler sets advertised and really wanted to get one for the kids but hadn’t done it yet. I was super excited to get picked for this party. And the product didn’t let me down!

IMG_20170717_184345

My 8yr old loves the pen and had no trouble figuring out how to use it. Basically, you have a battery operated pen (rechargeable) that you feed plastic sticks into. The plastic is melted by the pen and you use it to create 3D objects. The melted plastic is warm to the touch but not hot enough to burn or harm you or your kids. And it solidifies completely in about 10 seconds. Even my 4yr old enjoys using the 3Doodler.

IMG_20170727_124424

At 4 he doesn’t quite have the fine motor skills to create anything very impressive but he has a blast doing what his older sisters are doing and crafting with them.

IMG_20170716_202914

I did make him a helicopter and he just loves it! It was actually way easier to make than I expected. The 3Doodler Start kit has templates included and it makes it so easy to create some fun 3D plastic items!

IMG_20170716_131325

Though, sharing is hard, but they managed! We’ve had so much fun with our 3Doodler both at the party and after. And the kids just love experimenting and discovering what new things they can create!

I enjoy crafting and I just love any product that gets my kids creating different things in different ways. This 3Doodler is awesome and so much fun for both kids and adults!

Check out these tips here for getting started with your own 3Doodler.

Or take a look at this YouTube video to help you get started on your first project. It’s so easy and fun!

The Very Hungry Caterpillar Craft

HungryCaterpillar

The Very Hungry Caterpillar by Eric Carle is a well loved favorite in my house. Even my 8yr old still loves it!

So, naturally, when I told the kids we were going to do a fun caterpillar craft, we had to read the book, about a doze time, before we could get started crafting.

We had so much fun making these cute little caterpillars. My girls even made some to take and share with friends, because, honestly, they’re so cute!

These little caterpillars are also fast, and easy to make. For your littles, just have them line up their little pompoms in the order they want them and you do the gluing. My 8yr old was thrilled with the prospect of using the hot glue gun so she insisted on making her own.

WormSupplies

Supplies:

PomPoms
Googly Eyes
Hot Glue Gun

Sounds easy so far! Now, just line up however many pomPoms you want, in whatever color order you want and hot glue them together. After the glue has dried (which is super fast in case your toddler is wondering) you can hot glue gun or stick on the eyes. I prefer the glue because they stick better.

Just look at this cute little caterpillar!

GreenWorm2

Easter Egg Jars

EasterEggJars

Looking for a super duper easy Easter craft or gift to make with your kids. These Easter Egg mason jars are easy, fast, and fun.

Ingredients:

Shredded coconut
Green food coloring
Colored Egg Candies
Small Mason Jars
Large Ziplock Bag

GrassIngredients

    1. Pour your coconut into the ziplock bag.
    2. Add just a little bit of green food coloring (1/8 to 1/4 tsp depending on how much green you want)
    3. Close the bag, leaving lots of air.
    4. Shake the bag (or do what I did, and have your kids shake the bag) until all the coconut is green.

GreenGrass

  1. Pour your “grass” into your mason jars and top with eggs. You could also toss on a little rabbit or chick if you want more variety.
  2. Want more eggs in your jar? Hide some in the grass and then add the eggs on top.
  3. Set your jars out open on the counter or put on the lid and give as an Easter gift to friends and family.

EggJar

Dinosaurs and Cookies

How do Dinosaurs Eat Cookies by Jane Yolen & Mark Teague.

Our book topic for this month’s book craft was “How Do Dinosaurs…” I’d never read this series before but it sounded like fun.

I went a little overboard and check out maybe a dozen from the library – and there’s still more! The kids didn’t mind because these books are super cute, and fun to read. They all have a fun rhyme and my 3yr old loves dinosaurs so he was very excited to have all sorts of dinosaur books to read.

With the cold snap last week, baking cookies together was a great project. We made chocolate cookies with multi-colored dinosaur eggs (mini m&m’s). So much fun, and so tasty!

Along we way we got to talk about how dinosaurs help in the kitchen – they don’t throw the m&m’s btw. And how dinosaurs are very polite when they eat their cookies.

How do Dinosaurs Eat Cookies is a super cute board book with “scratch & sniff” cookies throughout. Lots of fun to read together over and over.

IMG_20170316_192822620

Dinosaur Egg Cookies

1 cup butter, softened
3/4 cup granulated sugar
3/4 cup packed brown sugar
1 tsp vanilla extract
2 eggs
2 1/4 cups flour
1/3 cup cocoa
1 tsp baking soda
1/2 tsp salt
1 package mini m&ms – or other chocolate chips of your choice

  1. Heat oven to 350
  2. With an electric mixer, blend together butter, sugars, and vanilla until creamy. Add eggs one at a time, mixing well.
  3. In a separate bowl, mix together flour, cocoa, baking soda, and salt. Gradually add flour mixture to sugar mixture, until well blended.
  4. Stir in mini m&ms
  5. Drop by rounded teaspoons onto ungreased cookie sheet.
  6. Bake 8 to 10 minutes or until set. Cool about 5 minutes then remove from cookie sheet to wire rack.

Makes 5 to 6 dozen cookies

DinoCookies

This post does contain affiliate links.

Come join us for the Monthly Crafting Book Club. Each month we focus on a different book and encourage early literacy by pairing it with a craft.

Monthly Crafting Book Club


How To Draw a Giraffe

IMG_20170218_144348215

Our Book for our monthly Book Craft Challenge was “Giraffes Can’t Dance” by Giles Andreae and Guy Parker-Rees. I’d never read this book so I checked it out from the library – along with the half of the library that my kids selected – and read it with the kids.

I was trying to come up with a giraffe craft to do and my kids didn’t want to do anything with constructions paper. Finally, my 8yr old suggested that we draw a giraffe. So I drew, and she drew. Her giraffe dances way better than mine! And then my 6 yr old and 3 yr old colored all my giraffe pictures.

IMG_20170218_145729426

This book is super cute and so much fun. The rhyme is great and it’s pretty short so you can read it multiple times without getting tired. My kids loved drawing and coloring Gerald!

Use a pencil, write lightly, so you can erase as needed.

Step 1. Draw an outline for the body, neck, and head. Write lightly, because a lot of these lines will be erased later.

IMG_20170218_140820140_TOP

Step 2. Add some legs. Gerald (the Giraffe) had long, gangly legs so no need to be perfect.

IMG_20170218_141009649

Step 3. Add some details. Tail, mane, horns, ear, fill out the eye and mouth a bit.

IMG_20170218_141259691

Step 4. Erase your extra lines. Aren’t you glad you drew lightly? Color in the tail, hooves and any other dark areas.

IMG_20170218_142315579

Step 5. Draw your spots, color in your giraffe.

IMG_20170218_145345218

Or, draw your spots and let your kids color in the giraffe. Be creative, My 8 yr old made her giraffe dancing.

giraffe

Check out these other fun Giraffe Crafts!

Giraffe's Can't Dance Craft - Monthly Crafting Book Club is celebrating Giraffe's Can't Dance Crafts this month with a group of bloggers and crafts to show that Giraffes CAN dance.

This post does contain affiliate links.

Chick Fil A Upcycle Challenge

I’m part of a ChickFilA mom’s panel and for February they are having a upcycle challenge with the Chick Fil A soup bowls.

IMG_20170215_131146104Which, if you haven’t tried their soup. You need to. My kids love the chicken noodle and the southwestern chicken is my favorite, even though I don’t usually enjoy spicy foods.

Then we took our soup containers and the girls made little jewelry boxes. This was a fun and easy craft and we made something useful – just maybe their jewelry will end up in these boxes and not all over the floor!

IMG_20170215_131643749

Supplies:

  1. ChickFilA soup container – washed and dried
  2. Paint – we used acrylic paint and some puffy paint
  3. Newspaper – for covering your surface, you don’t want to be cleaning acrylic paint off your table
  4. Paintbrushes – we used foam brushes and regular brushes, it’s all about how you prefer to paint
  5. Cup of water – for rinsing brushes
  6. Paper towels – for drying brushes, wiping hands, etc.
  7. If your kids are doing the painting I also recommend an old shirt or paint smock for them.

IMG_20170215_160331108

Instructions:

  1. Wash and dry your containers
  2. Spread newspaper over your work surface
  3. Paint containers with the acrylic paint. You might want a couple of coats if you want more coverage, I tried to convince my kids to use more paint but they really liked the textured look they were getting with just one coat. Rinse and lay out your brushes to dry. Let your containers dry completely
  4. Add designs with the puffy paint. My girls attempted to draw jewelry with their paint. They even traced the Chick Fil A logo on the lid of their containers because they love Chick Fil A and thought it was so cool to have Chick Fil A jewelry boxes. The puffy paint is also great for keeping the containers from sliding around on hard surfaces. Let this dry overnight or however long your puffy paint says.
  5. Fill with jewelry 🙂

This project was so much fun and let the kids get super creative.

IMG_20170216_115123434

IMG_20170216_114941979


Ladybug Girl Craft

Ladybug Girl and Bumblebee Boy is one of my children’s favorite books. We received this book years ago as part of Dolly Parton’s Imagination Library program. Which is a program she started here in Tennessee that mails each child under 5 one free book a month. We’ve discovered some truly awesome children’s books this way!

Since I have boys and girls, Ladybug Girl and Bumblebee Boy is a great book to read to all of them together, because there’s a fun character for each of them to follow along with.

And since all my kids love dressing up, this book is just so much fun!

I was excited when I saw that my monthly crafting book club was doing Ladybug Girl this month. My kids love this book, and they had so much fun making their own ladybug.

Supplies

Black Construction Paper
Red Construction Paper
White Paper
Scissors
Craft Glue
Pipe Cleaner

LadybugSupplies

Directions

  1. Cut 2 red circles – I folded my paper in half and cut them together so they’re exactly the same size.
  2. Cut one of these red circles in half.
  3. Cut 1 black circle – about 1/3 the size of the red circles
  4. Cut many tiny black circles of varying sizes
  5. Cut your pipe cleaner into six equal pieces
  6. Cut two eyes – I folded my paper in half and cut them together so they’re the same size.

LadybugSupplies2

  1. Glue the black circle to the top of the red circle.
  2. Glue the two red half circles on top of the head, open them up as little or as much as you want for wings.
  3. Place some glue on the ends of each pipe cleaner piece and insert them between the red circle and the red half circles.
  4. Glue the eyes on the head
  5. Glue black dots on your red ladybug
  6. Let it dry before play with it

Ladybug2

This post does contain affiliate links.

Did you get a chance to see the other amazing crafts shared below by the other fabulous bloggers???