Dinosaurs and Cookies

How do Dinosaurs Eat Cookies by Jane Yolen & Mark Teague.

Our book topic for this month’s book craft was “How Do Dinosaurs…” I’d never read this series before but it sounded like fun.

I went a little overboard and check out maybe a dozen from the library – and there’s still more! The kids didn’t mind because these books are super cute, and fun to read. They all have a fun rhyme and my 3yr old loves dinosaurs so he was very excited to have all sorts of dinosaur books to read.

With the cold snap last week, baking cookies together was a great project. We made chocolate cookies with multi-colored dinosaur eggs (mini m&m’s). So much fun, and so tasty!

Along we way we got to talk about how dinosaurs help in the kitchen – they don’t throw the m&m’s btw. And how dinosaurs are very polite when they eat their cookies.

How do Dinosaurs Eat Cookies is a super cute board book with “scratch & sniff” cookies throughout. Lots of fun to read together over and over.

IMG_20170316_192822620

Dinosaur Egg Cookies

1 cup butter, softened
3/4 cup granulated sugar
3/4 cup packed brown sugar
1 tsp vanilla extract
2 eggs
2 1/4 cups flour
1/3 cup cocoa
1 tsp baking soda
1/2 tsp salt
1 package mini m&ms – or other chocolate chips of your choice

  1. Heat oven to 350
  2. With an electric mixer, blend together butter, sugars, and vanilla until creamy. Add eggs one at a time, mixing well.
  3. In a separate bowl, mix together flour, cocoa, baking soda, and salt. Gradually add flour mixture to sugar mixture, until well blended.
  4. Stir in mini m&ms
  5. Drop by rounded teaspoons onto ungreased cookie sheet.
  6. Bake 8 to 10 minutes or until set. Cool about 5 minutes then remove from cookie sheet to wire rack.

Makes 5 to 6 dozen cookies

DinoCookies

This post does contain affiliate links.

Come join us for the Monthly Crafting Book Club. Each month we focus on a different book and encourage early literacy by pairing it with a craft.

Monthly Crafting Book Club


Mini Chicken Pot Pies

chickenpotpie

These little chicken pot pies are perfect for cold winter days. My kids thought that having their own bowl was awesome! Plus the biscuits fit perfectly on top this way. Feel free to make this in one big pan if you don’t want to do personal ones.

Chicken Pot Pie

8 ovenproof bowls or ramekins, about 1 cup each
4 Cups chicken broth
1/4 tsp ground pepper
1/4 tsp ground thyme
2 bay leaves
4 green onions, sliced in chunks
4 skinless, boneless chicken breasts
3 Tablespoons butter
1 Cup diced carrots
1 Cup frozen peas, thawed
1 Cup frozen corn, thawed
5 Tablespoons flour
1 Cup milk
8 Biscuits

  1. Combine chicken broth, pepper, thyme, bay leaves, and onion in a large pan over high heat. Bring to a boil then reduce heat and simmer for 30 minutes.
  2. Add the chicken and continue simmering for another 20 to 30 minutes or until chicken is cooked through. Add enough water to the pot to fully cover the chicken if too much liquid has cooked off.
  3. Remove the chicken and place on a cutting board to cool. Strain the broth. You’ll need 2 1/2 cups.
  4. Cut the chicken into bit size pieces.
  5. In a skillet on the stove, melt the butter over medium heat. Add the carrots and cook, stirring occasionally, for 5 minutes.
  6. Add the peas and corn to the skillet and cook, stirring occasionally, for another 5 minutes.
  7. Stir in the 5 Tablespoons flour just until combined or all the vegetables are coated.
  8. Add 2 1/2 cups chicken broth and the milk. Cook, stirring constantly, until thickened. About 5 minutes.
  9. Remove the skillet from the heat. Stir in the chicken.
  10. Preheat oven to 375
  11. Dish out pot pie filling into the ramekins or oven safe bowls and set aside.

img_20170105_170831_643

  1. Make biscuits and roll them out to 1/4 inch thick. If you’re using refrigerated biscuits, use half a biscuit.
  2. Place 1 biscuit on top of each ramekin filled with pot pie filling.
  3. Bake in a 375 degree oven for 30 minutes or until tops of biscuits are golden brown.

Last Minute Gift Idea

Scrambling for a last minute gift for that impossible to buy for someone? Here’s a super simple and delicious treat anyone can make.

20161116_102142Russian Tea

1 Cup Tang
1 Cup Lipton Instant Tea
1/4 tsp ground cloves
1/4 tsp ground cinnamon

Mason Jar
Pretty Ribbons

  1. If you have a funnel, use it. It makes pouring into your mason jar so much easier! Pour all 4 of your ingredients in your jar. Put the lid on tight. Shake your jar for a minute or two, until all the ingredients are blended.
  2. Add Ribbon and any other mason jar decorations that you like. Don’t forget to include the serving instructions.
  3. Serving instructions: Combine two heaping spoonfuls of tea mix with hot water in your favorite mug. Stir and enjoy!

Talk about fast and easy! These would also make great teacher gifts, neighbor gifts, or a fun addition to a snack basket or cookie exchange. Be creative. This is so easy to make, and it’s so delicious, you’ll want to make sure you make one for yourself.

20161116_102647

Ginger Cookies

img_20160828_184646444

My very favorite holiday recipe. I’ve made these for years and I never get tired of them.

Ginger Cookies
2 1/4 cups flour
2 tsp ground ginger
1 tsp baking soda
3/4 tsp cinnamon
1/2 tsp ground cloves
3/4 cup butter, softened
1 cup sugar
1 egg
1/4 cup molasses
2 Tbsp. sugar

Preheat oven to 350. In a bowl, combine flour, ginger, baking soda, cinnamon, and cloves. Set aside.

In a large mixing bowl, beat butter with an electric mixer on medium to high speed for 30 seconds. Gradually add the 1 cup sugar, beating on low speed until fluffy. Add the egg and molasses; beat well. Using a wooden spoon, stir flour mixture into egg mixture.

Shape dough into 1 1/2 inch balls. Roll balls in the 2 Tbsp sugar. Place about 2 1/2 inches apart on ungreased cookie sheets. Bake about 10 minutes.

Makes 24.

Christmas List for the Home Chef – plus giveaway

This is a sponsored post.

Mom’s can be so hard to shop for! For me, I love to cook. So anything for my kitchen is awesome! Here’s 5 of my favorite kitchen items that I’ve gotten this year. AND a giveaway for a product of choice from the Youcopia range. (full details below). I’m just loving my new YouCopia products!

1. YouCopia StoreMore Adjustable Lid Holder – My tupperware lids had taken over! YouCopia came to my rescue! Seriously, organization is always a challenge in a busy kitchen and I was really tired of fighting my Tupperwares every time I had to hunt for lids. You know how you end up with half the cabinet out on the floor before you just pick a different container? All my lids fit so neatly in this lid holder.

It’s so nice to open my tupperware cabinet, pull out the container I want, and my lid is just sitting right there. No more digging.

I did receive this product free for purposes of my review, but all opinions are my own.

2. YouCopia StoraStack Food Container Storage Organizer, Drawer Solution – As you can tell, I love having things organized. It just makes cooking and cleaning so much easier and my kitchen just runs so much more smoothly when everything is organized.

This is an organizer for your drawer. It has an adjustable tab on the back so you can adjust it to snugly fit any drawer. That way our organized containers aren’t sliding all over your drawer. The tabs also adjust so you can organize any size container.

I did receive this product free for purposes of my review, but all opinions are my own.

3. YouCopia Spice Liner in Drawer Spice Organizer 6-Pack – This is another drawer organizer. Can you tell that I’m on an organizing kick this year?

I ended up using these to organize our pen/pencil/marker/crayon drawer – otherwise known as the art drawer. I store all my spices in my cabinet so I didn’t really need to organize them into a drawer. However, my art drawer was in desperate need of a makeover.

These drawer organizers worked great! Now all the writing supplies are organized and don’t roll all over the drawer anymore because this drawer liner keeps them in place.

I did receive this product free for purposes of my review, but all opinions are my own.

4. Bellemain Stainless Steel 3 Cup Flour Sifter – I needed a flour sifter. The reviews on this sifter were great. So I bought it. There’s a reason it’s marked as one of Amazon’s best sellers.

It’s super easy to use. The hand crank is so much nicer than the squeeze sifter that I used to have. All the four sifts through it so I don’t have any excess flour left in the sifter. The large open top makes it easy to pour my flour in. Then I just turn the crank and my sifted flour falls through into my bowl.

If you’re looking for an easy to use sifter, that works great. Look no further.

5. Cast Iron Flour Corn Tortilla Press – This thing is awesome! The directions that came with mine said to “line” with with saran wrap. Which was just too thin and tore up too easily. I tried wax paper instead and it worked great.

The dough is so easy to mix up, then you just smash little balls of dough in the press and cook them on a hot skillet for a couple of minutes. Super easy and you get fresh, warm, delicious shells when you’re done!

Now that I’ve shown off some of my favorite new “toys”, comment below and tell me, what new kitchen accessory have you gotten this year?

And enter below for a chance to win a product of choice from the Youcopia range for a value of up to $40.00. Giveaway ends 21st of December. Full terms and conditions can be read on the widget. Open to USA residents only.

Win a YouCopia product of your choice #4

Cheesy Bacon Potatoes

potatoes

I love potatoes, bacon, and cheese! Side dishes just don’t get much better than this.

Cheesy Bacon Potatoes

Ingredients
6 medium potatoes
1 1/2 cups heavy cream
1 cup grated sharp cheddar cheese
4 pieces fresh cooked bacon broken into pieces, or 1/4 cup bacon bits
2 cloves garlic crushed
salt & pepper to taste

  1. Preheat oven to 350. Grease bottom and sides of a 9X9 casserole pan.
  2. Peel and slice potatoes into thin slices. Mix potatoes with heavy cream, 1/2 cup cheese, garlic, and salt & pepper.
  3. Spread evenly in prepared pan. Top with 1/2 cup cheese and bacon bits.
  4. Bake for 1 hour or until potatoes are tender


Favorite Flavors of Ireland – Recipe & Review

carrotsoup

I was so excited to try out this new cookbook in preparation for St. Patrick’s Day. I love cooking, but haven’t tried out a lot of Irish recipes.

I was actually surprised at how simple the food is. There’s a lot of bread, meat, potatoes, cabbage, and carrots in this cookbook. I found so many recipes that I like that it was hard to pick one to share. I’m all about the basics and ingredients that I know how to use. This cookbook is awesome and has so many different and delicious ways to make all of your classic Irish foods.

IMG_20160222_180908463
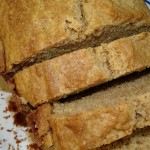
I tried out Soda Bread (which is not only tasty but super easy!), Champ Potatoes (basically mashed potato deliciousness), Carrot Cake with Cream Cheese Icing (DELICIOUS!, luckily, I’m the only one in my family who likes carrot cake, so I got to eat it all), and Carrot Soup. Next on the list to try is Cheese Potatoes, Blueberry Muffins, and Rib eye.

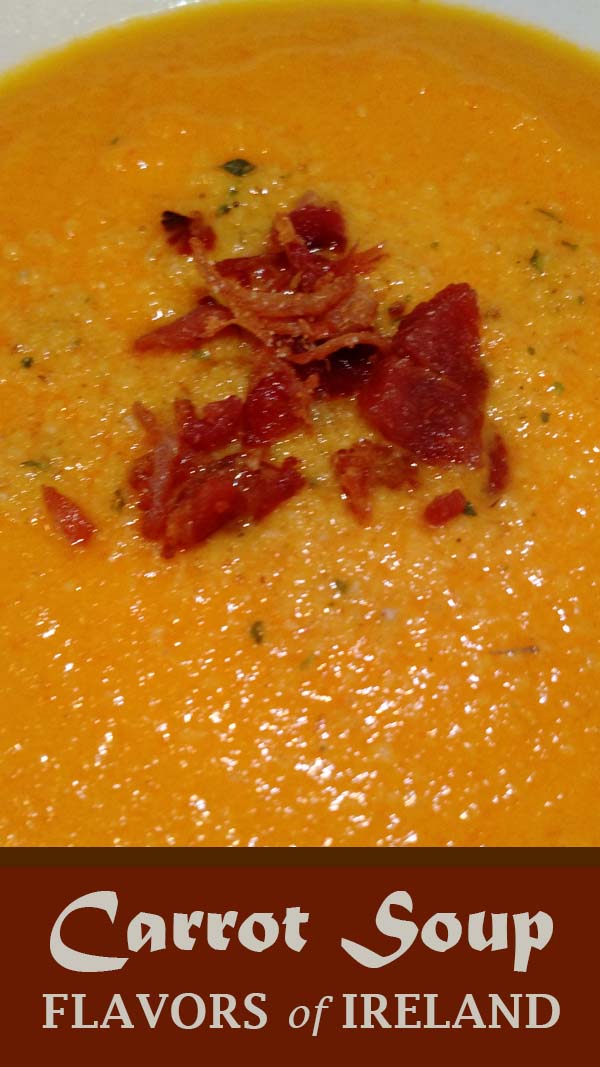
I finally decided to share the carrot soup recipe because this is my kid’s favorite – I think it’s delicious as well. For some reason my 5yr old has this great love of carrot soup, so I’ve tried out many, many carrot soup recipes. This recipe is simple, and honestly the best tasting carrot soup I’ve made yet. She’s already asking me when I’m going to make it again!

Before I share the recipe, here’s the cookbook. Favorite Flavors of Ireland by Margaret M. Johnson. It also features Kerrygold Butter, which is way creamier than my usual Kroger store brand butter. It comes in a block, and I had no problem finding it at Trader Joe’s.

FlavorsOfIreland

The book captures Ireland’s culinary beauty season-by-season, and includes more than 100 recipes. There’s a section of Spring recipes like Lamb with Port and Mint Sauce. Summer recipes like Fish ‘n Chips. Autumn recipes like Peppered Pork Loin Roast. And, Winter recipes like Shepherd’s Pie.

You can purchase your own copy of the book and find out more about it here.

The author, Margaret M. Johnson is author of ten cookbooks—Christmas Flavors of Ireland; Flavors of Ireland; The Irish Pub Cookbook; Irish Puddings, Tarts, Crumbles, and Fools; The Irish Spirit; The New Irish Table; The Irish Heritage Cookbook; Tea & Crumpets; Cooking With Irish Spirits; and Ireland: Grand Places, Glorious Food. As a food and travel writer she has contributed to publications in both the U.S. and Ireland including Intermezzo Magazine; SIP, For the Love of Drink Magazine: Cooking Light; Cara, the inflight magazine of Aer Lingus; Dublin’s Food & Wine Magazine; the Irish Echo newspaper; and to online sites such as thewildgeese.com, and irishabroad.com. She frequently appears at Irish food and cultural events, and when she’s not visiting her ancestral home in Ireland, she lives in Westhampton Beach, NY.

I’m thoroughly enjoying her Favorite Flavors of Ireland cookbook.

Carrot Soup with Bacon Bread Crumbs

Bacon Bread Crumbs
2 slices American Bacon
2 slices firm white sandwich bread
2 tbsp. chopped fresh flat-leaf parsley
freshly ground black pepper to taste

Soup
1 tbsp. Kerrygold Irish butter
1 tbsp. extra virgin olive oil
2 lbs./900 g carrots, peeled and sliced
1 large onion, chopped
1 tbsp. minced garlic
10 whole cloves, wrapped and tied in cheesecloth
4 cups/1 L homemade chicken stock or canned low-salt chicken broth
1 tbsp. fresh lemon juice
Pinch of sugar
salt and freshly ground pepper to taste
6 tbsp. heavy cream
Minced fresh flat-leaf parsley for garnish

  1. To make bread crumbs, in a medium skillet over medium heat, cook the bacon for 7 – 9 minutes, turning frequently, or until crisp. Transfer to paper towels to drain. Discard all but 2 tbsp. fat from the pan.
  2. In a food processor, pulse the bread 8 – 10 times to medium-fine crumbs. Transfer bread crumbs to bacon fat and cook, stirring occasionally, for about 8 minutes, or until golden. Transfer to a small blow.
  3. Pulse the bacon in the food processor to fine bits and stir into the bread crumbs. Stir in the parsley and pepper. Set aside.
  4. To make the soup, in a large saucepan over medium heat, heat the butter and oil. Add the carrots, onions, garlic, and cloves and cook for 8 – 10 minutes, or until the vegetables are soft but not browned.
  5. Add the stock or broth, cover, and simmer, stirring occasionally, for about 30 minutes, or until the carrots are very soft. Remove the soup from the heat and let cool for 10 minutes. Discard the cloves.
  6. Working in batches, transfer the soup to a food processor or blender and puree until smooth. (or, puree in the pot with an immersion blender.) Return the puree to the saucepan over medium heat and stir in the lemon juice, sugar, and cream. Simmer until heated through and season with salt and pepper.
  7. To serve, ladle the soup into 6 shallow bowls and sprinkle with the parsley and bread crumbs.

I might add, that this makes a lot of soup! It re-heats well though, so we enjoyed carrot soup for a couple of days.

I received this product free for purposes of my review. All opinions are my own.


Colored Eggs

Ingredients
1. Eggs
2. Water
3. White Vinegar
4. Food coloring
5. Lemon juice

First step is to hard boil your eggs. Place the desired number of eggs in a pan (I usually throw in a few extra because one or two usually crack), fill the pan with cold water just to cover the eggs. Bring to a boil on the stove and boil for 5 minutes. Turn off stove and let cool. If you’re in a hurry you can drain off the hot water, fill the pan with cold water, and repeat until the water is no longer pouring out hot – I always find that this method will crack an egg or two so I try to just wait if I can.

Fun with the Eggs

Egg coloring (per color)
2/3 cup hot water
2 Tbsp white vinegar
Food coloring

Combine the water and vinegar in a small bowl – make sure it’s big enough to put your egg in it – then add food coloring until you reach your desired shade. The vinegar helps set the color so you get a much more vibrant color.

After all your colors are mixed gently place the egg in a color and let it soak until your egg reaches the desired shade.

Be creative, there’s lots of ways to make speckled or designed eggs.

1. Wrap a rubberband around your egg before soak it for a crazy striped egg
2. Wrap a small piece of lace around your egg before soaking for a fancy design – this method also gives you a little “handle” for your egg so it’s a lot easier for kids to dip and soak the eggs
3. Dip half the egg in one color and half the egg in another color
4. Dye one color and then paint with another – the kids love this too! You can make special egg “paint” with less water and vinegar and more food coloring.

I like to dry my eggs on my cookie racks set over a stack of newspapers or paper towels. Remember, food coloring stains, so don’t get it on anything you don’t want colored.

Cleanup

Now, for the lemon juice. If your kids are like mine, their hands are now multi-colored. Lemon juice is great for removing color from little fingers! I just gave mine a small bowl and they pre-washed their hands with lemon juice before actually washing their hands with soap and water. Didn’t remove all the color but it got way more off than just soap and water.

Tuna Casserole

I don’t know about you, but this time of year, with school activities, extra activities for the kids, and work, I’m super busy and just don’t have a lot of time to make dinner.

This is one of my favorite quick meals. I can mix it up quickly then get my kitchen clean and a load or two of laundry folded while it’s in the oven. Because it’s always nice to clean up before dinner!

This recipe is also easy to personalize. If your kids don’t like peas, use broccoli, or carrots, or any vegetable you want.

Tuna

Tuna Casserole
1/2 package egg noodles (or if you don’t have egg noodles, 1/2 package of any noodle will do)
1 can tuna, drained
1/2 cup grated parmesan cheese
1 can condensed cream of chicken soup (or other creamy soup that you prefer)
1 cup frozen peas (or any other vegetable)
1/2 cup grated cheddar cheese
1/4 cup milk

1. Turn oven to 350

2. Cook noodles following the package directions

3. After your noodles are cooked, drain, mix noodles, tuna, parmesan cheese, soup, peas, and milk together in a baking pan.

4. Top with grated cheese

5. Cook at 350 for 20 – 25 minutes or until cheese is beginning to brown and casserole is heated through.


Ham and Cheese Ore-Ida Totchos

Totchos My husband went out to dinner the other night with some co-workers so I thought it would be a good night to try out a newOre-Ida Totchos recipe with my Ore-Ida Tater Tots. The kids were skeptical at first but once they started eating, they all told me how much they loved it!

When my husband got home and saw the leftovers on the counter he asked when I was going to make it again because he wants to try it too. He thought it looked delicious!

These are super easy to make, and they make a great quick meal for the family.

Ham & Cheese Ore-Ida Totchos

1/2 bag Ore-Ida Tater Tots
1/2 lb chopped ham
1 cup grated chese
sour cream
handfull of bacon bits

1. Cook tater tots per package directions.

2. While tater tots are cooking cook/warm ham in a skillet on the stove. Add a little water to the pan if needed to keep the ham from sticking.

IMG_20160115_1802265843. Place cooked tater tots and ham in individual bowls (I like to make things per person because with little kids this is just easier)

4. Top with grated cheese, sour cream, and then bacon bits.

5. Enjoy!

It’s just like a ham and cheese loaded baked potato, just without the peel, so my kids will eat it all!

Want more Totchos recipes? Check out Ore-Ida’s website.

I received this product free from @Influenster for purposes of my review. All opinions are my own. #OreidaTotchos #contest