Lemon Tart

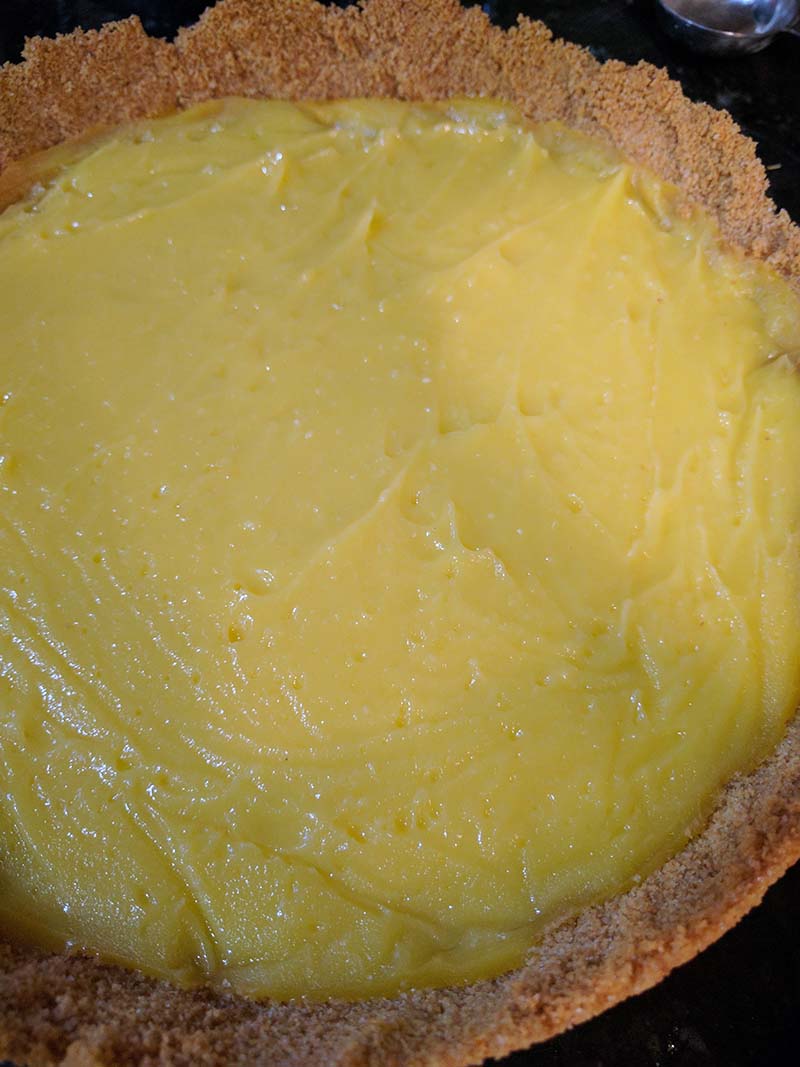
I’ve been trying out new recipes for Easter Dinner Desserts and I’m just loving this Lemon Tart. It’s the perfect blend of sweet and sour and everyone in my family loves it!

Plus it’s a make ahead and refrigerate overnight kind of recipe, which is perfect so it’s one less thing I have to worry about the day of my dinner.

This is one recipe I’m definitely making this Easter!

LemonTart


Crust:

12 Graham Crackers
2 TBSP sugar
5 Tablespoons butter – melted

  1. Crumble the graham crackers and sugar in a food processor until you have fine crumbs.
  2. Add the butter and pulse until well combined.
  3. Press onto bottom and sides of an 8 or 9 in springform pan.
  4. Bake at 350 for 10 minutes
  5. Set aside to cool

Filling:

1 Cup Sugar
1 TBSP grated lemon zest
1/2 Cup lemon juice
3 whole eggs
3 egg yolks (yes, you need eggs plus extra yolks)
4 TBSP butter

  1. Combine the sugar, lemon zest, lemon juice and eggs in a sauce pan. Whisk until well combined.
  2. Cook over medium heat, stirring constantly (very important), until the mixture is nice and thick. About 6 minutes.
  3. Remove from heat and stir in butter until fully combined.
  4. Strain through a fine-mesh sieve into your graham cracker crust. Smooth. Place plastic wrap on top to prevent a skin forming and refrigerate overnight.

IMG_20170325_190204

Whipped Cream:

1 cup heavy whipping cream
1 TBSP sugar

  1. Beat whipping cream and sugar in a bowl with an electric mixer (you can do this by hand, but it will take forever) until the the whipped cream is nice and thick.
  2. Spoon dollops of whipped cream on your tart when serving.

Starting Again

We all hate starting over – at least I do, so I assume everyone else does. Even my kids hate starting again. Because usually we’re starting over because we got something wrong. And if there’s anything worse that starting over, it’s admitting that I’ve gotten something wrong.

I often have to remind myself of my favorite teaching phrase for my kids. “If you’re not making mistakes, you’re not learning”. My daughter gets frustrated because she has to re-start a division problem that she just got all wrong. My middle child really doesn’t want to try to read that word for the 5th time. And my toddler simply does not want to attempt putting that there one more time.

But I’m the same. I would honestly prefer that my banana creme pie didn’t turn out as soup the first time. I figured out why, it’s some chemical breakdown of the corn starch if you cook it too much. But it turned out right the second time. I just had to try again.

I’ve watched my kids refuse to try something because they were afraid of failure. I’ve failed to try things because I’m afraid of failure. And I hate starting over.

But, like I tell my kids, starting over is how we learn. If I’m getting it all right all the time then I’m not growing, and I’m not learning, and I’m not getting any better at anything. I’m just doing what I already know.

Truth be told, most great successes, have a string of failures before them. Most of the time, before someone succeeds at something they have to start over again and again. Thomas Edison is famous for saying “I have not failed. I’ve just found 10,000 ways that won’t work”. He started over so many times, and eventually succeeded.

One thing I’ve been working to teach my kids is to not be afraid of starting over. Go, try, make the mistake, take what you’ve learned, try again. Each time you do this you’ve learned something and you’ve increased your chances of getting it right the next time.

Of course, this means that I have to be an example and try new things, and try new things again.

So far this year, I’ve learned how to NOT make a banana creme pie and I’ve learned how to make a banana creme pie. Now if I could just figure out a good sausage gravy and biscuits…

What’s something you’ve had to start again this year?

This #BloggersTalkingAbout series features amazing bloggers writing from the heart. Continue reading more by following these links. Starting Over by Joanne | Starting Again by Jenny | When It’s Time To Start Again by Traci | Making Mistakes by Karen | Starting Over by Alicia | Crafty Me by Karen | The Delicate Art Of Starting Again by Nikki | Starting Over by Brandy | Starting Over by Wendy | If you’re a mom/female blogger, join us in our group, Bodacious Bloggers

Mini Chicken Pot Pies

chickenpotpie

These little chicken pot pies are perfect for cold winter days. My kids thought that having their own bowl was awesome! Plus the biscuits fit perfectly on top this way. Feel free to make this in one big pan if you don’t want to do personal ones.

Chicken Pot Pie

8 ovenproof bowls or ramekins, about 1 cup each
4 Cups chicken broth
1/4 tsp ground pepper
1/4 tsp ground thyme
2 bay leaves
4 green onions, sliced in chunks
4 skinless, boneless chicken breasts
3 Tablespoons butter
1 Cup diced carrots
1 Cup frozen peas, thawed
1 Cup frozen corn, thawed
5 Tablespoons flour
1 Cup milk
8 Biscuits

  1. Combine chicken broth, pepper, thyme, bay leaves, and onion in a large pan over high heat. Bring to a boil then reduce heat and simmer for 30 minutes.
  2. Add the chicken and continue simmering for another 20 to 30 minutes or until chicken is cooked through. Add enough water to the pot to fully cover the chicken if too much liquid has cooked off.
  3. Remove the chicken and place on a cutting board to cool. Strain the broth. You’ll need 2 1/2 cups.
  4. Cut the chicken into bit size pieces.
  5. In a skillet on the stove, melt the butter over medium heat. Add the carrots and cook, stirring occasionally, for 5 minutes.
  6. Add the peas and corn to the skillet and cook, stirring occasionally, for another 5 minutes.
  7. Stir in the 5 Tablespoons flour just until combined or all the vegetables are coated.
  8. Add 2 1/2 cups chicken broth and the milk. Cook, stirring constantly, until thickened. About 5 minutes.
  9. Remove the skillet from the heat. Stir in the chicken.
  10. Preheat oven to 375
  11. Dish out pot pie filling into the ramekins or oven safe bowls and set aside.

img_20170105_170831_643

  1. Make biscuits and roll them out to 1/4 inch thick. If you’re using refrigerated biscuits, use half a biscuit.
  2. Place 1 biscuit on top of each ramekin filled with pot pie filling.
  3. Bake in a 375 degree oven for 30 minutes or until tops of biscuits are golden brown.

Banana Cream Pie

There’s just something about a good banana cream pie. I tried out this pudding recipe earlier this year and loved it.

The pudding takes 5 egg yokes and since I doubled the pudding recipe for this pie I ended up using 10 egg yokes. And with my 10 extra whites I made meringues. I now have a house full of meringue cookies! (the meringue cookie recipe is coming up next)

Banana Cream Pie

Nilla Wafers for crust

4 bananas thinly sliced

Pudding
2              C whole milk

¾             C heavy cream

½             C sugar

3              T cornstarch

2              T flour

¼             t salt

5              large egg yolks

¼             C unsalted butter cut into ½” cubes

1              t vanilla extract

(double this for group sized pie)

Topping
2              C whipping cream

8              T sugar

¼             t rum flavoring

  1. Bring milk and cream to a simmer in a medium saucepan. Meanwhile, whisk sugar, cornstarch, flour, and salt in a large mixing bowl. Add egg yolks; whisk until smooth (mixture will be very thick). Whisking constantly, gradually add milk mixture to yolk mixture. Return to saucepan and cook over medium-low heat, whisking constantly, until thick, 2-3 minutes. Add butter and vanilla, whisk until smooth. Transfer to a medium bowl; press plastic wrap directly onto surface of pastry cream. Chill until set, at least 2 hours.
  2. Line bowl with nilla wafers. Put ½ cup pastry cream evenly over bottom of bowl. Layer half of the bananas. Spread ¾ cup pastry cream over bananas, layer the rest of the bananas. Spread the remainder of the pastry cream over bananas.
  3. Beat whipping cream, sugar, and rum flavoring until medium-stiff peaks form. Spread over pastry cream and serve.

Dutch Apple Pie

So, Cayenne pepper is my new favorite spice. I made an apple pie yesterday and I couldn’t resist using it. Before you think, oh, no!, spicy apple pie. Don’t worry, I didn’t use that much! I’ve discovered that a tiny amount of cayenne pepper adds flavor to sweet foods without being spicy.

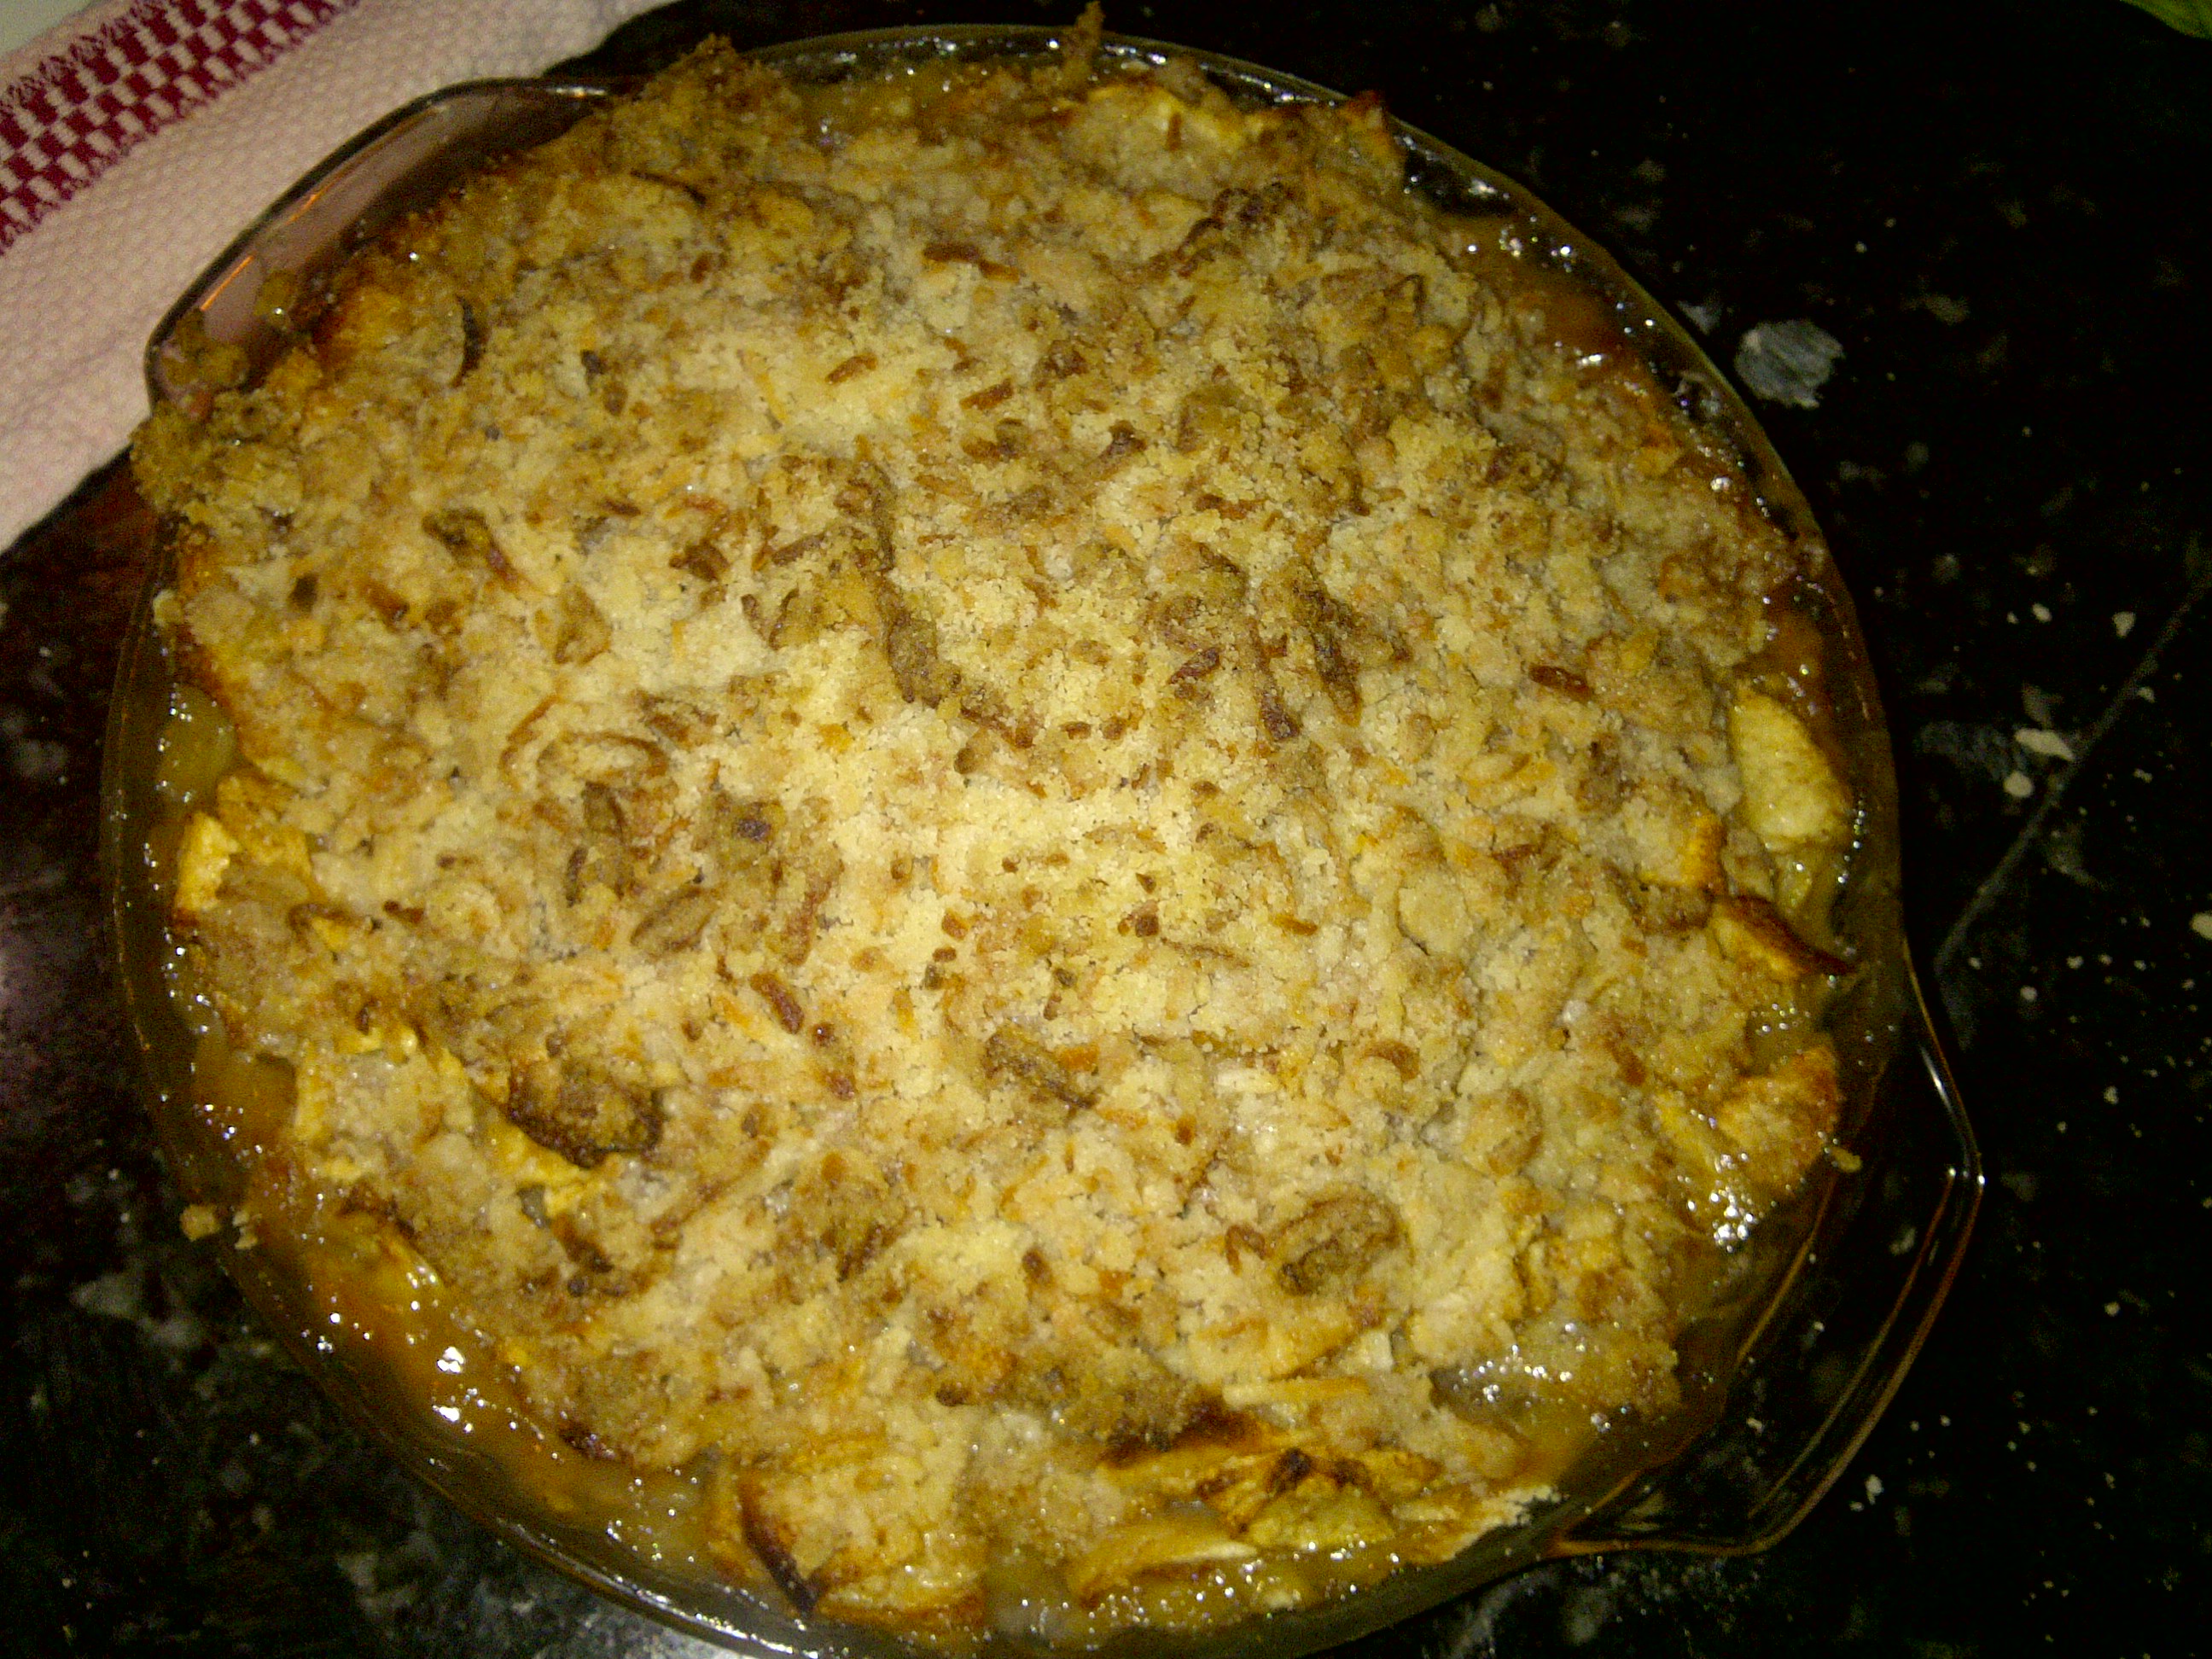
I was making a dutch apple pie and when I went to make the crumb topping I discovered that I was out of brown sugar. The pie was already sitting in the pan ready to go and I really didn’t want to make a crust for the top. So, I improvised:

1 C Sugar
1/8 t cayenne pepper
1/2 C shredded coconut
4T unsalted butter

Blend well and sprinkle on top. It was quite yummy! The pepper adds flavor without adding spice, and without it I think using the white sugar would have been a bit too bland for the top of my apple pie.

I also tried a new crust, which actually turned out! I have trouble with my crusts being too tough. I think I overwork them. Use oil instead of butter, so you mix it all together with a fork and then press it into the pan instead of rolling it out. My crust was actually flaky for once!


Peanut Butter Pie

I tried this pie out over the weekend.

You cook the filling on the stove and let it set in the fridge for a couple of hours. As you can see, mine was still a little bit soft when I took this picture.

But, I loved the pie! It was really rich so you could only eat a small piece, but it was very tasty!

And the honeycomb on top was so easy to make. You mix 1/4 C water, 1T honey, 3T corn syrup, and 1 1/2C sugar in a saucepan until it starts to boil, then you turn the heat up and let it boil, swirling the pot occasionally until the sugar just starts to brown (and don’t wait for it to get a dark brown, I had to make two batches because my first one was too brown and it tasted burnt). At the first tint of brown, remove it from the heat and whisk in 1T baking soda (it will bubble really high so use a large saucepan) immediately pour the whole thing out on a cookie sheet lined with wax paper and let it sit for 20 minutes. Then you can break or cut it in pieces and eat. It doesn’t store really well, it tends to get a bit chewy after a couple of days.

Santa Fe Chicken Casserole

I tried out another recipe with cooking creme. This time I tried the Santa Fe cooking creme. It’s not bad, I definitely like the italian and the garlic cremes better. I think the Santa Fe blend is a little spicy. My husband and cousin think it’s barely spicy at all. So I guess it all depends on how spicy you tolerate your food. For me, apparently, not at all.

However, I did like the recipe that I tried. (I just had to have lots of water when I ate it).

Santa Fe Chicken Casserole.

The only note I would make when cooking this is, if you’re not using a deep dish pie pan, put toothpicks in your casserole to keep the aluminum foil from sticking to the cheese. I lost a lot of cheese when I pulled my aluminum foil off.