Truffle Shuffle Review

Truffle Shuffle sent me a box of supplies for their ice cream sandwich class, AND I got to attend their ice cream sandwich making online class, in exchange for a review.

With trying to reduce trips to the store these days, I’ve been getting lots of deliveries. So, I’m not stranger to receiving a box of food in the mail. A couple days before my scheduled class I received a box stuffed full of ingredients and yummy Truffle Shuffle items – I desperately wanted to eat some of these items before my class, but I managed to wait.

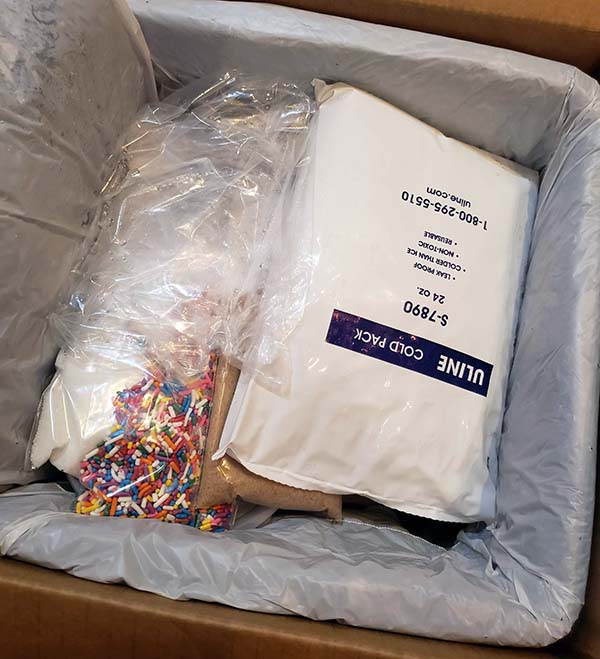
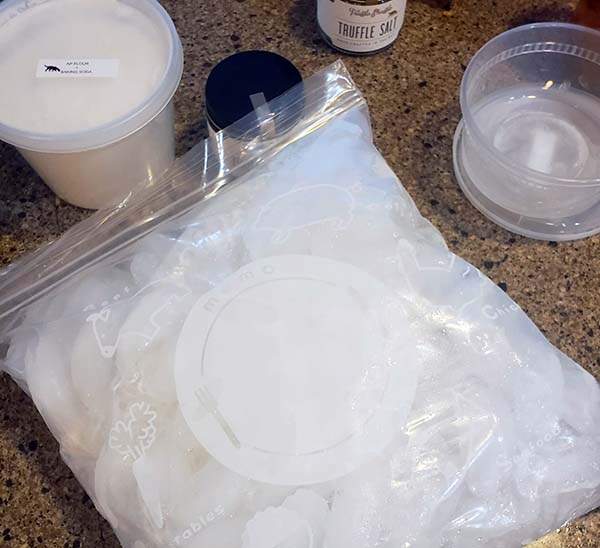
Everything arrived in an insulated box with ice packets. These packets still had some ice left in them so Truffle Shuffle definitely did a great job packing! Especially when you consider that the heat indexes were up into the 100’s the week my box arrived.

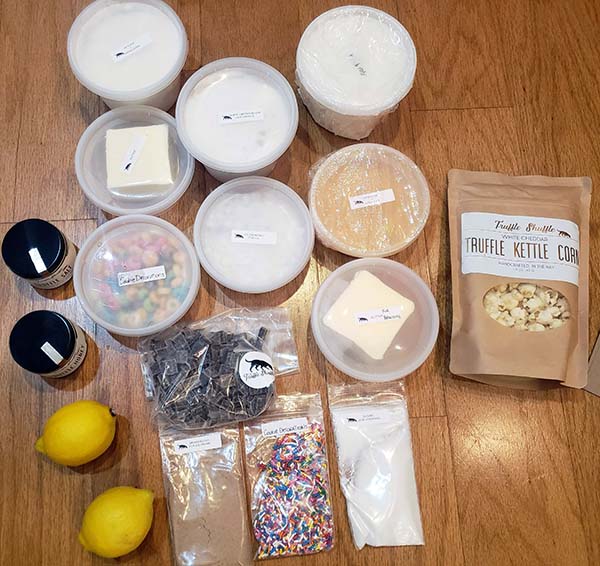
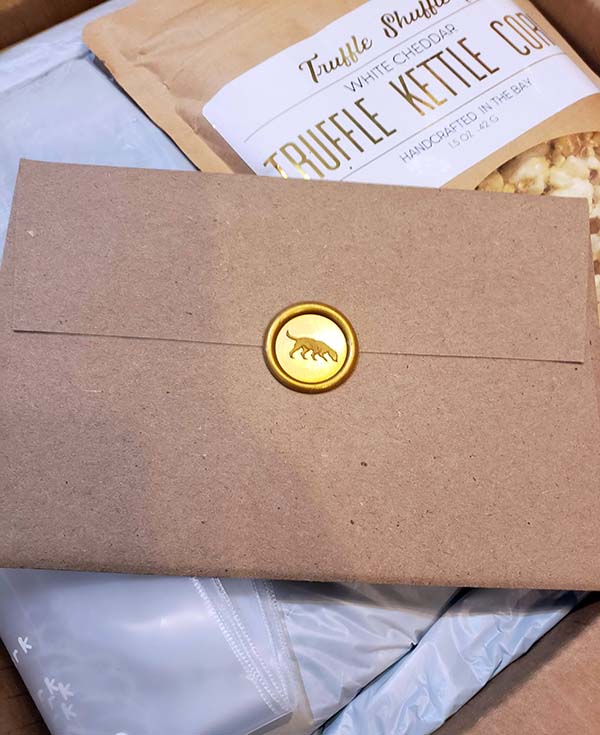
Everything arrived well packaged, well labeled, and pre-measured. Well, except for the truffle salt and truffle honey, they sent extra! I should add here, that truffle salt is amazing!!!

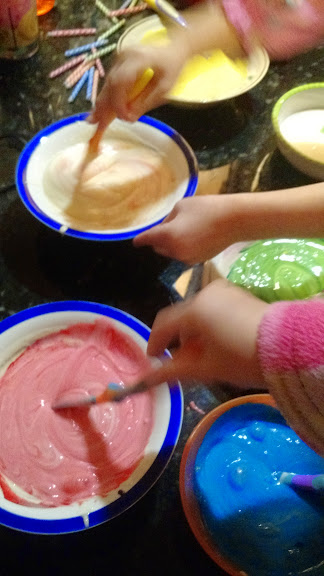
I put the perishables in the fridge and the non perishables in a neat stack on the table and waited for the class I had signed up for. And warned the kids that they were not allowed to eat the sprinkles!

Class is conducted via zoom and generally the screen looks like this. Sometimes they fullscreen on the chefs if they’re showing you something. If your camera is on, they’ll cycle through participants and you get to see what everyone else is doing. Don’t want to be seen? Leave your camera off. They did a terrific job of walking through the steps with you. At times, they would ask everyone to signal thumbs up that they had completed the step and were ready to move on. So, just like a real in person cooking class, they made sure everyone was keeping up and ready to go.

Several times people typed in questions and they were very quick to answer those. I feel like this class was amazingly interactive and fun!

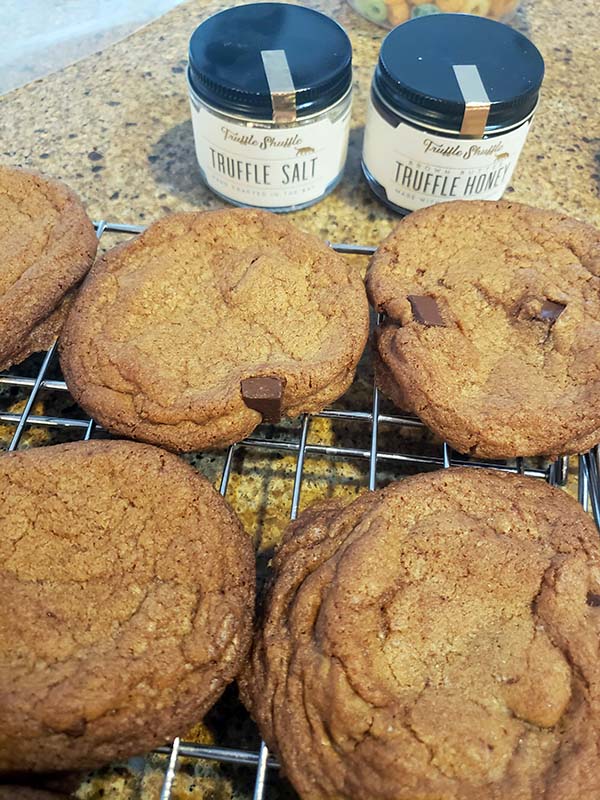
I learned some fun cooking tips that I hadn’t known previously – like why we were browning butter for the cookies. And they did a terrific job of time management! For example, I know you’re all wondering what the lemons are for. They’re for 2 things. We made lemon ice cream with the lemon zest, and we made lemonade with the lemon juice.

We did the ice cream first. I had never made ice cream without an ice cream maker, so I was kinda skeptical, but it worked perfectly!

After mixing, and a lot of shaking! we put the ice cream in the freezer to sit while we did everything else. After mixing the cookies, while they were baking and cooling, we made lemonade.

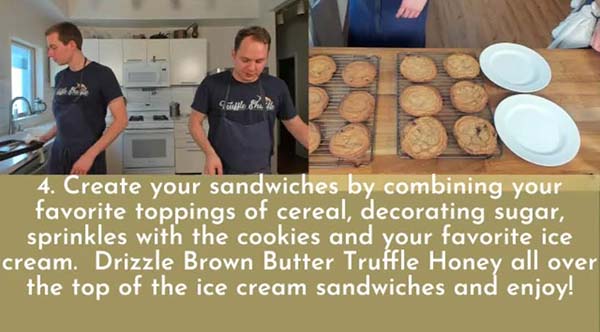
When the lemonade was finished, the ice cream was ready, and the cookies were cooled, so we assembled our ice cream sandwiches. The class was scheduled for 1.5 hours and they were right on that time. Which is pretty incredible when you consider that they’re virtually walking a dozen households through making ice cream, cookies, lemonade, and assembling ice cream sandwiches.

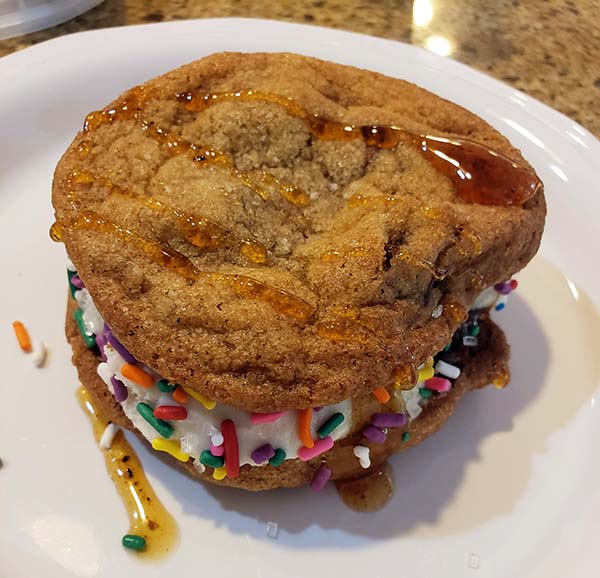
I’m pretty proud of how my ice cream sandwich turned out! Several of the participants (actually about half of them) had their kids doing the class and the parent was just supervising. The kids kept up without a problem and they made the class so much more fun! Next time I sign up for a class, I’m going to have my kids make me dinner.

I highly recommend this class. I learned some new cooking techniques. Got to cook with truffle salt and truffle honey, a new thing for me. And, everyone enjoyed assembling and eating their own ice cream sandwiches!

Want to join a class of your own? Use my link for 10% off!


Carrot Ginger Soup

I was given a pdf copy of My Pinewood Kitchen in exchange for my review. I love cooking and I’ve been doing a LOT of it with being home so much. So, needless to say, I’m getting bored with my recipes and dying for something new.

This cook book looked healthy, hearty, and delicious. And I’ve not been disappointed!

I’ve been attempting to make a carrot soup that I like – and my last one was a major bust (as in, sorry kids, you don’t have to eat it) – so I decided to give this one a try. I definitely haven’t tried one with an apple in it before, so I was quite curious as to how the added sweetness would taste.

Short On Inspiration While Dining In? My Pinewood Kitchen Dishes Out Some Quarantine Cuisine Tips

With COVID-19 keeping us at home more and shopping less, home chefs need to get creative while cooking tasty, healthy meals for their entire family. Chef and author Mee McCormick is an expert: she healed herself of Crohn’s disease, gut issues, and other immune system challenges with whole food recipes when doctors couldn’t help her.

The mom/rancher/restaurateur can share tips for “quarantine cuisine” when you’re hankering for variety in your meals but you’re short on ingredients and inspiration. Perfect for social distancing, many of her recipes are made with items you probably already have in your pantry (for example, her Black Bean Chicken Chili and Immune-Boosting Chicken & Quinoa Soup); she can teach home cooks how to repurpose items to reduce food waste (cilantro pickles, anyone?), and reveal the healthiest foods you need in your pandemic pantry.

My Pinewood Kitchen: A Southern Culinary Cure offers more than 100 gluten-free, whole foods recipes that can be customized for Keto, Paleo, or vegans, making it a truly “all-inclusive” eating plan for the entire family. From smoothies, soups and salads, to dinners and desserts, every recipe is gluten-free and gut-friendly.

•    Curb Your COVID Anxiety with healthy chocolate with Mee’s Chocolate Avocado Mousse & Five-Ingredient Fudge Cups
•    Soups for Social Distancing – Black Bean Chicken Chili and Immune-Boosting Chicken & Quinoa Soup (nutritious, delicious, and they use what you likely have in your home already!)
•    Plenty of plant-based offerings
•    Reduce Waste: Learn how to make cilantro pickles from cucumbers, sweet potato chips from sweet potatoes, a falafel burger from canned chickpeas, and how to make your own healthier ketchup and mayonnaise if you run out
•    10 Gut-Friendly Foods for your Pandemic Pantry

Mee McCormick is a rising Southern culinary and wellness innovator, restaurateur, author, TV cooking personality, farmer, rancher, wife and mother. She splits her time between Nashville and nearby Nunnelly, Tennessee; a tiny, unincorporated community in Hickman County, which is also home to her biodynamic farm and restaurant Pinewood Kitchen & Mercantile.

Mee authored her first cookbook My Kitchen Cure, which led to wild success and a book deal with HCI for her second cookbook My Pinewood Kitchen, published on April 14, 2020. She frequently appears on Today in Nashville, and she participates in nationally-recognized food festivals and events, spreading the same level of care and hospitality to audiences everywhere that she has become known for throughout the state of Tennessee. Visit: www.meemccormick.com or www.pinewoodkitchenandmercantile.com.

My Pinewood Kitchen: A Southern Culinary Cure/130+ Crazy Delicious, Gluten-Free Recipes to Reduce Inflammation and Make Your Gut Happy
By Mee McCormick
HCI BOOKS
Released: April 2020/ $26.95
ISBN: 9780757323522
Available wherever books are sold

There are some absolutely amazing recipes in this book! Think terrific and tasty family meals, and the Carrot Ginger Soup did not disappoint!

Carrot Ginger Soup

Ingredients: 

3 tablespoons extra-virgin olive oil or ghee

1 large white onion, diced

3 cloves garlic, minced

2 tablespoons grated fresh ginger

1. pounds carrots

1 apple, chopped and skin on

4 cups Chicken Bone Broth (page 120) or Vegetable Broth (page 121) – directions in the cookbook

2 cups water

1/4 cup raw cashews

3/4 cup full-fat coconut milk

1 tablespoon miso

Sea salt (to taste)

Freshly ground black pepper (to taste)

Directions:

1) In a large saucepan over medium heat, heat the oil or ghee. Add the onion and sweat until soft. Add the garlic and ginger, and cook for about 3 minutes.

2) Add the carrots, apple, broth, water, and cashews. Bring to a boil and then simmer, covered, for 20 minutes. Allow to cool.

3) Transfer to a blender or food processor. Add the coconut milk and miso paste. Blend until smooth. Season with salt and pepper, to taste. Serve warm.

Incredibly easy and delicious! I paired this with some leftover ribs and steamed broccoli for an absolutely amazing dinner with the family!

Lemon Tart

I’ve been trying out new recipes for Easter Dinner Desserts and I’m just loving this Lemon Tart. It’s the perfect blend of sweet and sour and everyone in my family loves it!

Plus it’s a make ahead and refrigerate overnight kind of recipe, which is perfect so it’s one less thing I have to worry about the day of my dinner.

This is one recipe I’m definitely making this Easter!

LemonTart


Crust:

12 Graham Crackers
2 TBSP sugar
5 Tablespoons butter – melted

  1. Crumble the graham crackers and sugar in a food processor until you have fine crumbs.
  2. Add the butter and pulse until well combined.
  3. Press onto bottom and sides of an 8 or 9 in springform pan.
  4. Bake at 350 for 10 minutes
  5. Set aside to cool

Filling:

1 Cup Sugar
1 TBSP grated lemon zest
1/2 Cup lemon juice
3 whole eggs
3 egg yolks (yes, you need eggs plus extra yolks)
4 TBSP butter

  1. Combine the sugar, lemon zest, lemon juice and eggs in a sauce pan. Whisk until well combined.
  2. Cook over medium heat, stirring constantly (very important), until the mixture is nice and thick. About 6 minutes.
  3. Remove from heat and stir in butter until fully combined.
  4. Strain through a fine-mesh sieve into your graham cracker crust. Smooth. Place plastic wrap on top to prevent a skin forming and refrigerate overnight.

IMG_20170325_190204

Whipped Cream:

1 cup heavy whipping cream
1 TBSP sugar

  1. Beat whipping cream and sugar in a bowl with an electric mixer (you can do this by hand, but it will take forever) until the the whipped cream is nice and thick.
  2. Spoon dollops of whipped cream on your tart when serving.

Monster Pretzels

pretzel

These are so easy to make. And so fun to make! My girls helped me with these and they opted not to put any of the halloween sprinkles on, but insisted on using hearts instead!

Any way you do it, have fun! They taste great too, so make a bunch, because if you don’t you’ll wish you had.

Pretzel Monsters

  • Bag (or two) of Chocolate covered pretzels – I just buy the cheapest chocolate covered pretzels I can find at the grocery store
  • Candy making chocolate in various colors – green and orange are great monster colors!
  • Assorted sprinkles

Spread parchment paper out on 2 cookie sheets.

Spread pretzels out on sheets in a single layer.

Melt the candy chocolate in a ziploc bag in the microwave. Microwave 15 to 30 seconds, mix and repeat until chocolate is smooth.

Cut a small hole in the corner of the bag and pipe into the top two sections of the pretzel. Immediately, add a large sprinkles for the eyes. (this is a great part for the kids, you pipe, and they stick on the sprinkles)

Let cool, remove from the tray, and enjoy.

I like to just set out a bowl of these on the counter when guests come over. They’re fun and so tasty!


Food Fridays – Spaghetti Squash

spaghettisquash

Making “pasta” with spaghetti squash is surprisingly easy!

Baked Spaghetti Squash

1 medium to large spaghetti squash
1 Tbsp oil
Salt & Pepper to taste
Spaghetti sauce of your choice

Cut your squash in half. Using a spoon scrape out the seeds and center of your squash. Place squash inside up in a pan. Brush with oil and salt and pepper to taste.

Bake in a 450 oven for 60 minutes. Remove from the oven and let cook for a few minutes. Take a fork and shred your squash. It turns into “spaghetti”.

Top with your favorite sauce and toppings.

3 Thing Im Glad My Mother Taught Me

My mom taught me so much! And there’s lots I continue to learn. Thinking back through this year, there’s 3 things I’m so glad she taught me!

IMG_20150124_1949362231. Cooking – I cannot tell you how often I’m so glad I can cook! And I can do more than follow recipes, if I don’t have the right ingredients I improvise, I add spices as needed, and I’ll just wing it when I feel like it. Having confidence in the kitchen is such a blessing. I remember being at the counter helping bake, cook, and making a mess right along with my mom. Now, I let my kids do the same!

I’ll never forget the time I mixed up this beautiful tri-colored pound cake (in a bundt pan). I was in my early teens so fully capable of following a recipe. That cake was lots of work, and having three colors just made it more complicated. I successfully mixed it, baked it as instructed, and then set it on the rack to cool for 5 minutes. Next, continuing to follow the directions, I tipped it over and dumped it out onto the rack.

Only problem was, it wasn’t done. There were 3 colors of poundcake batter dripping down the counter and making a puddle on the floor. I cried, and I know my mom felt exactly as I did (even though she wasn’t crying). She had to clean up the mess. And then, we had a lesson on how to check a cake for doneness BEFORE tipping it over.

2. Sometimes Life is Hard – But you don’t give up. Life is constantly frustrating, irritating and just downright hard. But that’s all part of life, and definitely part of mothering.

Thankfully, that usually balances out with fun, love, and successes! You just don’t give up when things get hard, just keep going and things will come out ok in the end.

20141211_1316183. My Emotions are My Choice – I don’t mean I don’t have them. I can’t always choose when they’ll strike. But, I can be responsible for them. There are days I count to 10 before answering any questions. And there’s times I’m just tired, hungry, and crabby – and everyone knows it. That’s what coffee and chocolate are for!

Some days it’s really hard, but I can’t blame anyone for how I respond to things – like right now I would really like to tell the girls exactly what I think about them interrupting my writing for the 20th time instead of playing quietly in their room! Instead I calmly gave two choices. They can play quietly in their room until I come get them or they can take a nap like their Brother. We’ll see how long it lasts, but hopefully at least until I’m done writing!

With 2 girls I’ve started teaching emotional responsibility already. It’s ok to be mad – but we do not throw things or slam doors when we’re mad. It’s ok to be upset and it’s ok to cry – but we don’t yell at siblings or say unkind things because we’re upset. It’s not about not experiencing the emotion but it’s about remembering that no matter how I feel I still have a responsibility to be kind and considerate towards others.

Barley Bread

My 4yr old has been begging me for weeks to make her some barley bread. I think in Sunday School they heard the story of the feeding of the 5,000 and the little boy with the loaves had barley bread. My 4yr old definitely thought there must be something special about barley bread!

So, I found some barley in the cupboard the other day and decided to give barley bread a try. Luckily I have a wheat grinder so turning barley into barley flour was noisy but pretty easy.

Next, I had to find a recipe that only contained ingredients that I have on hand. Fortunately, that wasn’t too hard and this is what I tried:

Ingredients (Makes 1 Loaf)
  • 3 cups barley flour
  • 1 teaspoon salt
  • 2 tablespoons baking powder
  • 4 tablespoons sugar
  • 1/4 cup vegetable oil, plus extra for skillet
  • 2 eggs
  • 1 cup whole milk
  • Directions


    Preheat oven to 350 degrees F and lightly grease a 9 inch cast iron skillet with some vegetable oil and place in oven while preheating. (Why a cast iron skillet? It is the secret to a perfect crust.) If you don’t have a cast iron skillet then grease an 8 inch square pan and set-aside (not in oven).

    In a medium bowl, combine the flour, salt, and baking powder. Mix thoroughly.

    In a separate, smaller bowl, using an electric mixer set on medium-low speed, mix together the sugar, 1/4 cup oil, eggs, and milk. Slowly add the egg-mixture to the flour mixture until everything is just moistened.

    Pour batter into the cast iron skillet or prepared pan and bake 30 – 40 minutes, or until a toothpick inserted in the center comes out clean (internal temperature 190 degrees F. Cut into squares and serve warm.

    As you can see, it turned out light, fluffy, and crumbly, just like a cake. The barley was surprisingly mild tasting and my kids and I loved it!

    I’ll definitely be making this recipe again.

    Peanut Butter Pie

    I tried this pie out over the weekend.

    You cook the filling on the stove and let it set in the fridge for a couple of hours. As you can see, mine was still a little bit soft when I took this picture.

    But, I loved the pie! It was really rich so you could only eat a small piece, but it was very tasty!

    And the honeycomb on top was so easy to make. You mix 1/4 C water, 1T honey, 3T corn syrup, and 1 1/2C sugar in a saucepan until it starts to boil, then you turn the heat up and let it boil, swirling the pot occasionally until the sugar just starts to brown (and don’t wait for it to get a dark brown, I had to make two batches because my first one was too brown and it tasted burnt). At the first tint of brown, remove it from the heat and whisk in 1T baking soda (it will bubble really high so use a large saucepan) immediately pour the whole thing out on a cookie sheet lined with wax paper and let it sit for 20 minutes. Then you can break or cut it in pieces and eat. It doesn’t store really well, it tends to get a bit chewy after a couple of days.

    Santa Fe Chicken Casserole

    I tried out another recipe with cooking creme. This time I tried the Santa Fe cooking creme. It’s not bad, I definitely like the italian and the garlic cremes better. I think the Santa Fe blend is a little spicy. My husband and cousin think it’s barely spicy at all. So I guess it all depends on how spicy you tolerate your food. For me, apparently, not at all.

    However, I did like the recipe that I tried. (I just had to have lots of water when I ate it).

    Santa Fe Chicken Casserole.

    The only note I would make when cooking this is, if you’re not using a deep dish pie pan, put toothpicks in your casserole to keep the aluminum foil from sticking to the cheese. I lost a lot of cheese when I pulled my aluminum foil off.

    House Party Recipes

    I had my house party this weekend. If you haven’t checked out house parties you should. I love them! You get free stuff, in my case a skillet and food, to demo a new product with your friends.

    My party was for Philadelphia Cooking Creme.

    I made two pasta dishes, Chicken Primavera with Pasta

    and Tortellini Italiano.


    Both were really good! The Tortellini Italiano was my favorite. The red peppers added a sweet flavor to the cooking creme that wasn’t in the Chicken Primavera.

    Even my husband, who doesn’t like red peppers, liked the Tortellini Italiano best. He, of course, picked the red peppers out but he liked the flavor of the sauce with the peppers having been cooked in it.

    I really want to try out one of the mexican meals, they all look so good! I think that’s the cooking creme flavor I’ll try next.